.png)
Infraestructura: Uso de Terraform: Instalación y configuraciones básicas AWS y DigitalOcean
Dentro del mundo de los servidores está habiendo una revolución en la automatización del despliegue de servidores. Proyectos como Ansible, Chef o Puppet se han convertido en herramientas fundamentales a la hora de gestionar servidores en masa de una manera eficiente. Pero con la llegada del mundo de la cloud se ha visto necesario automatizar la creación de los servidores y las herramientas que debemos instalar. En esta ocasión veremos los primeros pasos para el uso de Terraform, para realizar estas tareas.
¿Para qué sirve Terraform?
Terraform es una herramienta creada por Hashicorp, los mismos dueños de Vagrant, Consul, Packer y Vault, así que no se puede decir que sean unos novatos en estas cuestiones. Nos va a permitir definir una serie de ficheros toda las configuraciones y definiciones de una infraestructura de servicios y servidores, incluyendo servicios en la nube. De esta manera podremo disponer de un repositorio git con la información sobre cómo desplegar nuestros servidores en la nube. Esta manera de manejar servidores se denomina GitOps, o cómo manejar la parte de operaciones mediante un repositorio Git. Esto nos evitará tener que gestionar manualmente, todas y cada una de las acciones que necesitamos para desplegar un servidor. Tiene sentido hacer esto para un único servidor, seguramente no. Tiene más sentido hacerlo cuando sabemos que vamos a realizar estas acciones varias veces, pero con ligeras modificaciones. O si sabemos de alguien que lo ha hecho previamente, usar como base un módulo que haya hecho alguien de confianza para realizar estos despliegues de una manera más sencilla.
¿Cómo se instala Terraform en Ubuntu 20.04?
Terraform se instala de muchas manera quizá la más actualizada suele ser descargar el ejecutable desde la propia págia de terraform, darle permisos de ejecución y colocarlo en un directorio dentro del PATH. Veamos cómo se haría en una ubuntu 20.04:
$ sudo apt-get install wget unzip

$ TER_VER=curl -s https://api.github.com/repos/hashicorp/terraform/releases/latest | grep tag_name | cut -d: -f2 | tr -d \"\,\v | awk '{$1=$1};1'

$ wget https://releases.hashicorp.com/terraform/${TER_VER}/terraform_${TER_VER}linux_amd64.zip

$ unzip terraform${TER_VER}_linux_amd64.zip

$ sudo mv terraform /usr/local/bin/
De esta manera dispondremos del comando terraform, podemos probando ejecutando:
$ terraform -version
¿Donde vamos a desplegar?
Es hora de saber donde queremos desplegar nuestros servidores. para ello utilizaremos los proveedores de Terraform. Como podermos ver tenemos practicamente todos los principales provedores de cloud del mercado: AWS, Google Cloud, Digital Ocean, …
Una vez elegido el proveedor deberemos gestionar la conexión contra los API’s que nos nos ofrezca este proveedor, para empezar a realizar las acciones que necesita Terraform. Como esto varía de proveedor a proveedor, realizaremos una guía específica para algunos de ellos.
AWS CLI – El cli de la nube de Amazon
De cara a manejar mejor las credenciales de AWS instalaremos el cli de AWS versión 2
$ curl "https://awscli.amazonaws.com/awscli-exe-linux-x86_64.zip" -o "awscliv2.zip"

$ unzip awscliv2.zip

$ sudo ./aws/install
Esto debería instalar el comando aws en el directorio /usr/local/bin y al estar dentro del path ya deberíamos poder ejecutarlo desde cualquier directorio. Compruebalo ejecutando:
$ aws --version

aws-cli/2.0.38 Python/3.7.3 Linux/5.4.0-42-generic exe/x86_64.ubuntu.20
$ aws --version
aws-cli/2.0.38 Python/3.7.3 Linux/5.4.0-42-generic exe/x86_64.ubuntu.20
Creación de credenciales
Ahora deberemos configurar las credenciales para empezar a trabajar con los servidores de AWS. Para ello deberemos generar una Access Key y un Secret Key ID para poder autenticarnos.
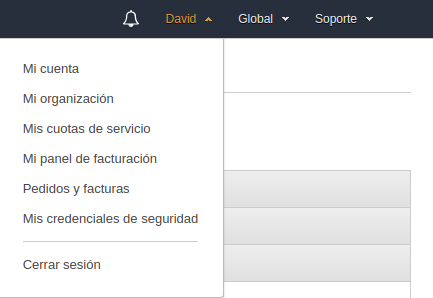
Para ellos nos loguearemos en la AWS Console. E iremos a nuestro menú de usuario y Mis credenciales de seguridad
Después iremos a Claves de Acceso y pulsaremos el botón de crear una clave de acceso, que nos mostrará la información de las dos claves.
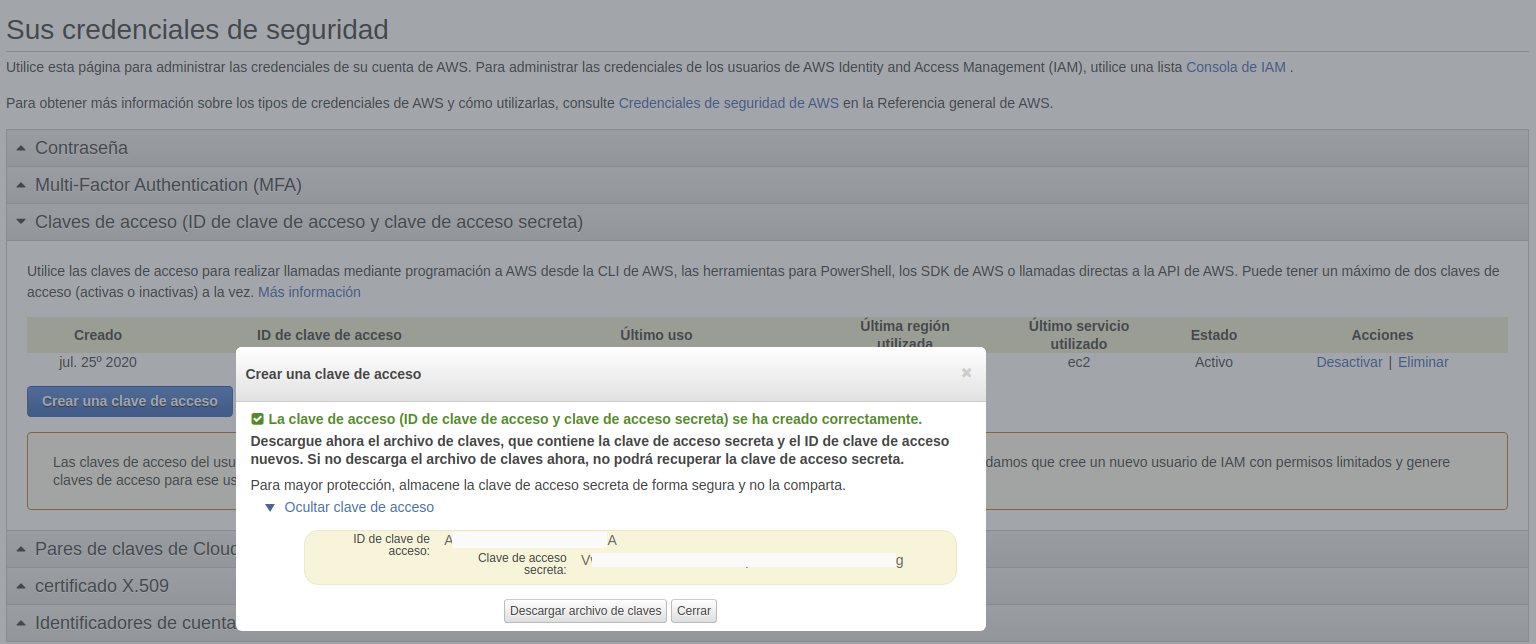
Nos descargaremos el archivo de claves porque lo utilizaremos más adelante par configurar las credenciales de aws, recuerda guardar a buen recaudo este fichero, ya que con estas claves alguien malintencionado puede usarlas para gaster dinero de tu tarjeta de crédito.
Configuración del AWS CLI
Después ejecutaremos un comando que nos permitirá guardar estas credenciales para tener acceso con el cli:
$ aws configure
Nos pedirá las claves de acceso y el secret y la zona por defecto donde desplegar, en mi caso eu-west-3, y el formato por defecto de salida, por ejemplo, json
Esto guardará las credenciales y las configuraciones en el directorio ~/.aws en los ficheros credentials y config.
Con el siguiente comando podemos ver las configuraciones básicas del aws cli:
$ aws configure list

Name                    Value             Type    Location

----                    -----             ----    --------

profile                             None    None

access_key     ****************UJQQ shared-credentials-file

secret_key     ****************UJQQ shared-credentials-file

region                eu-west-3      config-file    ~/.aws/config
Digital Ocean Cli (doctl)
En el caso de Digital Ocean también dispone de un CLi para manejar la infraestructura, se instala de la siguiente manera:
$ cd ~

$ wget https://github.com/digitalocean/doctl/releases/download/v1.46.0/doctl-1.46.0-linux-amd64.tar.gz

$ tar xf ~/doctl-1.46.0-linux-amd64.tar.gz

$ sudo mv ~/doctl /usr/local/bin
Como podemos ver nos hace la instalación en el directorio /usr/local/bin por lo que al estar dentro del path deberíamos poder ejecutar el comando sin problema:
$ doctl

doctl is a command line interface (CLI) for the DigitalOcean API.
Usage:
doctl [command]
Available Commands:
1-click Display commands that pertain to 1-click applications
account Display commands that retrieve account details
auth Display commands for authenticating doctl with an account
balance Display commands for retrieving your account balance
billing-history Display commands for retrieving your billing history
completion Modify your shell so doctl commands autocomplete with TAB
compute Display commands that manage infrastructure
databases Display commands that manage databases
help Help about any command
invoice Display commands for retrieving invoices for your account
kubernetes Displays commands to manage Kubernetes clusters and configurations
projects Manage projects and assign resources to them
registry [EA] Display commands for working with container registries
version Show the current version
vpcs Display commands that manage VPCs
Flags:
-t, –access-token string API V2 access token
-u, –api-url string Override default API endpoint
-c, –config string Specify a custom config file (default “/home/pepesan/.config/doctl/config.yaml”)
–context string Specify a custom authentication context name
-h, –help help for doctl
-o, –output string Desired output format [text|json] (default “text”)
–trace Show a log of network activity while performing a command
-v, –verbose Enable verbose output
Use “doctl [command] –help” for more information about a command.
Creación del API Token
Después deberemos crear un API Token para poder autenticarnos contra los servidores de DO, para ello iremos a la página de Aplicaciones y API’s , donde pulsaremos el botón de Generate New Token.
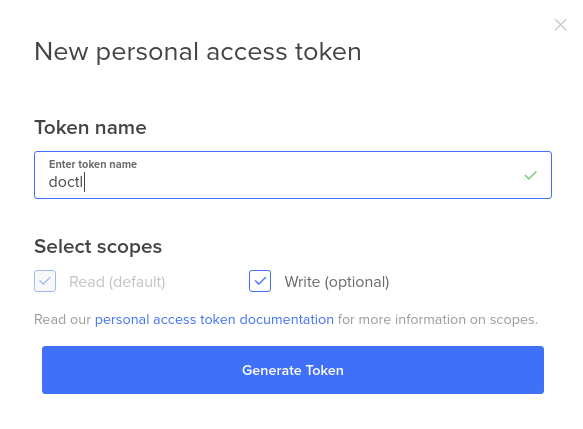
Rellenamos el nombre del token y pulsamos en el botón Generate Token y nos saldrá el código por pantlla, es la única vez que saldrá este token, así que guardalo inmediatamente en un fichero de manera segura, porque lo usarás más adelante.

Configuración del DOCTL
Ahora ya podemos meter la autenticación disponible para el comando doctl:
$ doctl auth init

Please authenticate doctl for use with your DigitalOcean account. You can generate a token in the control panel at https://cloud.digitalocean.com/account/api/tokens
Enter your access token:
Validating token… OK
Y ya tendremos este contexto creado y autenticado con doctl:
$ doctl account get

Email                Droplet Limit    Email Verified    UUID                                        Status

pepesan@gmail.com    25               true              c74321062f07c1dba570f9ab7a09011fff0cb836    active
Creando un repositorio de Infraestructura
Ya tenemos todo en configurado para empezar a funcionar con Terraform, pero ahora debemso decirle qué queremos hacer en concreto. Por simplicidad intentaremos crea una VPS nueva. Para ello crearemos un nuevo directorio para guardar estos despliegues.
$ mkdir mi-infra

$ cd mi-infra
AWS EC2
Para aws crearemos otro subdirectorio llamado aws
mkdir aws

cd aws
Ahora crearemos un fichero main.tf para definir la VPS
provider "aws" {

region = "eu-west-3"

}
data “aws_ami” “ubuntu” {
most_recent = true
filter {
name = “name”
values = [“ubuntu/images/hvm-ssd/ubuntu-focal-20.04-amd64-server-*”]
}
filter {
name = “virtualization-type”
values = [“hvm”]
}
owners = [“099720109477”] # Canonical
}
variable “ssh_key” {}
resource “aws_key_pair” “deployer” {
key_name = “deployer-key”
public_key = var.ssh_key
}
resource “aws_instance” “web” {
ami = data.aws_ami.ubuntu.id
instance_type = “t3.micro”
key_name = aws_key_pair.deployer.key_name
tags = {
Name = “HelloWorld”
}
}
Expliquemos un poco la estructura:
- provider define el proveedor a usar, en este caso AWS y define la región para hacer los depsliegues
- data consulta información de AWS para conocer al AMI (identificativo) de la magen a usar para crear la VPS
- define una variable ssh_key, que crearemos y usaremos para poder conectar
- resource define un recurso, una VPS en EC2, indicando el AMI, el tipo de instancia, dándole un tag nombre para identificarla en el interfaz de aws y asociándole la clave ssh
Ahora deberemos crear un fichero terraform.tfvars que permita meter valores a la variable que hemos definido
ssh_key="CONTENIDO FICHERO id_rsa.pub o el que sea"
Ahora deberemos inicializar el directorio de trabajo de aws
$ terraform init
Initializing the backend…
Initializing provider plugins…
– Checking for available provider plugins…
– Downloading plugin for provider “aws” (hashicorp/aws) 3.1.0…
The following providers do not have any version constraints in configuration,
so the latest version was installed.
To prevent automatic upgrades to new major versions that may contain breaking
changes, it is recommended to add version = “…” constraints to the
corresponding provider blocks in configuration, with the constraint strings
suggested below.
- provider.aws: version = “~> 3.1”
Terraform has been successfully initialized!
You may now begin working with Terraform. Try running “terraform plan” to see
any changes that are required for your infrastructure. All Terraform commands
should now work.
If you ever set or change modules or backend configuration for Terraform,
rerun this command to reinitialize your working directory. If you forget, other
commands will detect it and remind you to do so if necessary.
Con esto se habrá bajado el proveedor de aws, ahora debríamos planificar el despliegue:
$ terraform plan

Refreshing Terraform state in-memory prior to plan...

The refreshed state will be used to calculate this plan, but will not be

persisted to local or remote state storage.
data.aws_ami.ubuntu: Refreshing state…
An execution plan has been generated and is shown below.
Resource actions are indicated with the following symbols:
+ create
Terraform will perform the following actions:
aws_instance.web will be created
- resource “aws_instance” “web” {
- ami = “ami-00f6fb16625871821”
- arn = (known after apply)
- associate_public_ip_address = (known after apply)
- availability_zone = (known after apply)
- cpu_core_count = (known after apply)
- cpu_threads_per_core = (known after apply)
- get_password_data = false
- host_id = (known after apply)
- id = (known after apply)
- instance_state = (known after apply)
- instance_type = “t3.micro”
- ipv6_address_count = (known after apply)
- ipv6_addresses = (known after apply)
- key_name = (known after apply)
- outpost_arn = (known after apply)
- password_data = (known after apply)
- placement_group = (known after apply)
- primary_network_interface_id = (known after apply)
- private_dns = (known after apply)
- private_ip = (known after apply)
- public_dns = (known after apply)
- public_ip = (known after apply)
- secondary_private_ips = (known after apply)
- security_groups = (known after apply)
- source_dest_check = true
- subnet_id = (known after apply)
- tags = {
- “Name” = “HelloWorld”
} - tenancy = (known after apply)
- volume_tags = (known after apply)
- vpc_security_group_ids = (known after apply)
- ebs_block_device {
- delete_on_termination = (known after apply)
- device_name = (known after apply)
- encrypted = (known after apply)
- iops = (known after apply)
- kms_key_id = (known after apply)
- snapshot_id = (known after apply)
- volume_id = (known after apply)
- volume_size = (known after apply)
- volume_type = (known after apply)
} - ephemeral_block_device {
- device_name = (known after apply)
- no_device = (known after apply)
- virtual_name = (known after apply)
} - metadata_options {
- http_endpoint = (known after apply)
- http_put_response_hop_limit = (known after apply)
- http_tokens = (known after apply)
} - network_interface {
- delete_on_termination = (known after apply)
- device_index = (known after apply)
- network_interface_id = (known after apply)
} - root_block_device {
- delete_on_termination = (known after apply)
- device_name = (known after apply)
- encrypted = (known after apply)
- iops = (known after apply)
- kms_key_id = (known after apply)
- volume_id = (known after apply)
- volume_size = (known after apply)
- volume_type = (known after apply)
}
}
Plan: 1 to add, 0 to change, 0 to destroy.
Note: You didn’t specify an “-out” parameter to save this plan, so Terraform
can’t guarantee that exactly these actions will be performed if
“terraform apply” is subsequently run.
Si todo ha ido bien veremos la salida de arriba, si nos da algún problema con las credenciales revisa el fichero .aws/credentials
Ahora es cuando podremos desplegar la VPS:
$ terraform apply

data.aws_ami.ubuntu: Refreshing state...
An execution plan has been generated and is shown below.
Resource actions are indicated with the following symbols:
+ create
Terraform will perform the following actions:
aws_instance.web will be created
- resource “aws_instance” “web” {
- ami = “ami-00f6fb16625871821”
- arn = (known after apply)
- associate_public_ip_address = (known after apply)
- availability_zone = (known after apply)
- cpu_core_count = (known after apply)
- cpu_threads_per_core = (known after apply)
- get_password_data = false
- host_id = (known after apply)
- id = (known after apply)
- instance_state = (known after apply)
- instance_type = “t3.micro”
- ipv6_address_count = (known after apply)
- ipv6_addresses = (known after apply)
- key_name = (known after apply)
- outpost_arn = (known after apply)
- password_data = (known after apply)
- placement_group = (known after apply)
- primary_network_interface_id = (known after apply)
- private_dns = (known after apply)
- private_ip = (known after apply)
- public_dns = (known after apply)
- public_ip = (known after apply)
- secondary_private_ips = (known after apply)
- security_groups = (known after apply)
- source_dest_check = true
- subnet_id = (known after apply)
- tags = {
- “Name” = “HelloWorld”
} - tenancy = (known after apply)
- volume_tags = (known after apply)
- vpc_security_group_ids = (known after apply)
- ebs_block_device {
- delete_on_termination = (known after apply)
- device_name = (known after apply)
- encrypted = (known after apply)
- iops = (known after apply)
- kms_key_id = (known after apply)
- snapshot_id = (known after apply)
- volume_id = (known after apply)
- volume_size = (known after apply)
- volume_type = (known after apply)
} - ephemeral_block_device {
- device_name = (known after apply)
- no_device = (known after apply)
- virtual_name = (known after apply)
} - metadata_options {
- http_endpoint = (known after apply)
- http_put_response_hop_limit = (known after apply)
- http_tokens = (known after apply)
} - network_interface {
- delete_on_termination = (known after apply)
- device_index = (known after apply)
- network_interface_id = (known after apply)
} - root_block_device {
- delete_on_termination = (known after apply)
- device_name = (known after apply)
- encrypted = (known after apply)
- iops = (known after apply)
- kms_key_id = (known after apply)
- volume_id = (known after apply)
- volume_size = (known after apply)
- volume_type = (known after apply)
}
}
Plan: 1 to add, 0 to change, 0 to destroy.
Do you want to perform these actions?
Terraform will perform the actions described above.
Only ‘yes’ will be accepted to approve.
Enter a value: yes
aws_instance.web: Creating…
aws_instance.web: Still creating… [10s elapsed]
aws_instance.web: Creation complete after 13s [id=i-0b821a3b806e97d33]
Si usamos el parámetro –auto-approve no nos pedirá confirmación
Para borrar la VPS, y no seguir gastando dinero usaremos:
$ terraform destroy

data.aws_ami.ubuntu: Refreshing state...

aws_instance.web: Refreshing state... [id=i-0435068a6697bf6d3]
An execution plan has been generated and is shown below.
Resource actions are indicated with the following symbols:
– destroy
Terraform will perform the following actions:
aws_instance.web will be destroyed
- resource “aws_instance” “web” {
- ami = “ami-00f6fb16625871821” -> null
- arn = “arn:aws:ec2:eu-west-3:836821974678:instance/i-0435068a6697bf6d3” -> null
- associate_public_ip_address = true -> null
- availability_zone = “eu-west-3b” -> null
- cpu_core_count = 1 -> null
- cpu_threads_per_core = 2 -> null
- disable_api_termination = false -> null
- ebs_optimized = false -> null
- get_password_data = false -> null
- hibernation = false -> null
- id = “i-0435068a6697bf6d3” -> null
- instance_state = “running” -> null
- instance_type = “t3.micro” -> null
- ipv6_address_count = 0 -> null
- ipv6_addresses = [] -> null
- monitoring = false -> null
- primary_network_interface_id = “eni-0e1a26f96bd15010e” -> null
- private_dns = “ip-172-31-25-222.eu-west-3.compute.internal” -> null
- private_ip = “172.31.25.222” -> null
- public_dns = “ec2-15-236-179-234.eu-west-3.compute.amazonaws.com” -> null
- public_ip = “15.236.179.234” -> null
- secondary_private_ips = [] -> null
- security_groups = [
- “default”,
] -> null - source_dest_check = true -> null
- subnet_id = “subnet-1fffa464” -> null
- tags = {
- “Name” = “HelloWorld”
} -> null - tenancy = “default” -> null
- volume_tags = {} -> null
- vpc_security_group_ids = [
- “sg-bd825adc”,
] -> null - credit_specification {
- cpu_credits = “unlimited” -> null
} - metadata_options {
- http_endpoint = “enabled” -> null
- http_put_response_hop_limit = 1 -> null
- http_tokens = “optional” -> null
} - root_block_device {
- delete_on_termination = true -> null
- device_name = “/dev/sda1” -> null
- encrypted = false -> null
- iops = 100 -> null
- volume_id = “vol-08ddcb9e8223543a4” -> null
- volume_size = 8 -> null
- volume_type = “gp2” -> null
}
}
Plan: 0 to add, 0 to change, 1 to destroy.
Do you really want to destroy all resources?
Terraform will destroy all your managed infrastructure, as shown above.
There is no undo. Only ‘yes’ will be accepted to confirm.
Enter a value: yes
aws_instance.web: Destroying… [id=i-0435068a6697bf6d3]
aws_instance.web: Still destroying… [id=i-0435068a6697bf6d3, 10s elapsed]
aws_instance.web: Still destroying… [id=i-0435068a6697bf6d3, 20s elapsed]
aws_instance.web: Still destroying… [id=i-0435068a6697bf6d3, 30s elapsed]
aws_instance.web: Still destroying… [id=i-0435068a6697bf6d3, 40s elapsed]
aws_instance.web: Still destroying… [id=i-0435068a6697bf6d3, 50s elapsed]
aws_instance.web: Still destroying… [id=i-0435068a6697bf6d3, 1m0s elapsed]
aws_instance.web: Still destroying… [id=i-0435068a6697bf6d3, 1m10s elapsed]
aws_instance.web: Destruction complete after 1m11s
DO Droplet
Para Digital Ocean crearemos otro subdirectorio llamado do, dentro de la carpeta mi-infra
mkdir do

cd do
Ahora crearemos un fichero main.tf para definir la VPS
variable "do_token" {}

variable "ssh_pub_path"{}
provider “digitalocean” {
token = var.do_token
}
Create a new SSH key
resource “digitalocean_ssh_key” “web-ssh” {
name = “Terraform Example”
public_key = file(“${var.ssh_pub_path}”)
}
resource “digitalocean_droplet” “web” {
name = “tf-do”
image = “ubuntu-20-04-x64”
region = “fra1”
size = “512mb”
ssh_keys = [digitalocean_ssh_key.web-ssh.fingerprint]
}
output “ip” {
value = “${digitalocean_droplet.web.ipv4_address}”
}
Expliquemos un poco la estructura:
- define una viraables do_token, que crearemos y usaremos para poder conectar
- provider define el proveedor a usar, en este caso DigitalOcean y define el api token a usar, cogiéndola de la variable definida
- resource define un recurso, una VPS en DO, indicando el nombre del droplet, la imagen a usar, la región, el tamaño de la ram y la clave ssh a usar, como referencia a la que hemos creado antes
Faltaría crear un fichero donde coloquemos las variables llamado terraform.tfvars, que modificaremos para pasarle el API Token y la localización de la clave pública
do_token="API_TOKEN_DO"

ssh_pub_path="/home/usuario/.ssh/id_rsa.pub"
Ahora ya podemos incializar el workdir de do:
$ terraform init
Initializing the backend…
Initializing provider plugins…
The following providers do not have any version constraints in configuration,
so the latest version was installed.
To prevent automatic upgrades to new major versions that may contain breaking
changes, it is recommended to add version = “…” constraints to the
corresponding provider blocks in configuration, with the constraint strings
suggested below.
- provider.aws: version = “~> 3.1”
Terraform has been successfully initialized!
You may now begin working with Terraform. Try running “terraform plan” to see
any changes that are required for your infrastructure. All Terraform commands
should now work.
If you ever set or change modules or backend configuration for Terraform,
rerun this command to reinitialize your working directory. If you forget, other
commands will detect it and remind you to do so if necessary
Ver si podemos planificar el despliegue:
$ terraform plan

Refreshing Terraform state in-memory prior to plan...

The refreshed state will be used to calculate this plan, but will not be

persisted to local or remote state storage.
An execution plan has been generated and is shown below.
Resource actions are indicated with the following symbols:
+ create
Terraform will perform the following actions:
digitalocean_droplet.web will be created
- resource “digitalocean_droplet” “web” {
- backups = false
- created_at = (known after apply)
- disk = (known after apply)
- id = (known after apply)
- image = “ubuntu-20-04-x64”
- ipv4_address = (known after apply)
- ipv4_address_private = (known after apply)
- ipv6 = false
- ipv6_address = (known after apply)
- ipv6_address_private = (known after apply)
- locked = (known after apply)
- memory = (known after apply)
- monitoring = false
- name = “tf-do”
- price_hourly = (known after apply)
- price_monthly = (known after apply)
- private_networking = (known after apply)
- region = “fra1”
- resize_disk = true
- size = “512mb”
- ssh_keys = (known after apply)
- status = (known after apply)
- urn = (known after apply)
- vcpus = (known after apply)
- volume_ids = (known after apply)
- vpc_uuid = (known after apply)
}
digitalocean_ssh_key.web-ssh will be created
- resource “digitalocean_ssh_key” “web-ssh” {
- fingerprint = (known after apply)
- id = (known after apply)
- name = “Terraform Example”
- public_key = <<~EOT
ssh-rsa XXX
EOT
}
Plan: 2 to add, 0 to change, 0 to destroy.
Note: You didn’t specify an “-out” parameter to save this plan, so Terraform
can’t guarantee that exactly these actions will be performed if
“terraform apply” is subsequently run.
Ahora podmeos intenter desplegarlo con terraform apply
$ terraform apply
An execution plan has been generated and is shown below.
Resource actions are indicated with the following symbols:
+ create
Terraform will perform the following actions:
digitalocean_droplet.web will be created
- resource “digitalocean_droplet” “web” {
- backups = false
- created_at = (known after apply)
- disk = (known after apply)
- id = (known after apply)
- image = “ubuntu-20-04-x64”
- ipv4_address = (known after apply)
- ipv4_address_private = (known after apply)
- ipv6 = false
- ipv6_address = (known after apply)
- ipv6_address_private = (known after apply)
- locked = (known after apply)
- memory = (known after apply)
- monitoring = false
- name = “tf-do”
- price_hourly = (known after apply)
- price_monthly = (known after apply)
- private_networking = (known after apply)
- region = “fra1”
- resize_disk = true
- size = “512mb”
- ssh_keys = (known after apply)
- status = (known after apply)
- urn = (known after apply)
- vcpus = (known after apply)
- volume_ids = (known after apply)
- vpc_uuid = (known after apply)
}
digitalocean_ssh_key.web-ssh will be created
- resource “digitalocean_ssh_key” “web-ssh” {
- fingerprint = (known after apply)
- id = (known after apply)
- name = “Terraform Example”
- public_key = <<~EOT
ssh-rsa XXX
EOT
}
Plan: 2 to add, 0 to change, 0 to destroy.
Do you want to perform these actions?
Terraform will perform the actions described above.
Only ‘yes’ will be accepted to approve.
Enter a value: yes
digitalocean_ssh_key.web-ssh: Creating…
digitalocean_ssh_key.web-ssh: Creation complete after 2s [id=28131876]
digitalocean_droplet.web: Creating…
digitalocean_droplet.web: Still creating… [10s elapsed]
digitalocean_droplet.web: Still creating… [20s elapsed]
digitalocean_droplet.web: Still creating… [30s elapsed]
digitalocean_droplet.web: Creation complete after 34s [id=203325069]
Apply complete! Resources: 2 added, 0 changed, 0 destroyed.
Outputs:
ip = 46.101.170.16
Si usamos el parámetro –auto-approve no nos pedirá confirmación
Y después podemos destruirlo sin problema con terraform destroy
$ terraform destroy

digitalocean_ssh_key.web-ssh: Refreshing state... [id=28131876]

digitalocean_droplet.web: Refreshing state... [id=203325069]
An execution plan has been generated and is shown below.
Resource actions are indicated with the following symbols:
– destroy
Terraform will perform the following actions:
digitalocean_droplet.web will be destroyed
- resource “digitalocean_droplet” “web” {
- backups = false -> null
- created_at = “2020-08-10T10:36:01Z” -> null
- disk = 20 -> null
- id = “203325069” -> null
- image = “ubuntu-20-04-x64” -> null
- ipv4_address = “46.101.170.16” -> null
- ipv6 = false -> null
- locked = false -> null
- memory = 512 -> null
- monitoring = false -> null
- name = “tf-do” -> null
- price_hourly = 0.00744 -> null
- price_monthly = 5 -> null
- private_networking = false -> null
- region = “fra1” -> null
- resize_disk = true -> null
- size = “512mb” -> null
- ssh_keys = [
- “e8:54:63:be:ef:e4:aa:8a:35:42:ec:a2:3d:2b:6f:42”,
] -> null - status = “active” -> null
- tags = [] -> null
- urn = “do:droplet:203325069” -> null
- vcpus = 1 -> null
- volume_ids = [] -> null
}
digitalocean_ssh_key.web-ssh will be destroyed
- resource “digitalocean_ssh_key” “web-ssh” {
- fingerprint = “e8:54:63:be:ef:e4:aa:8a:35:42:ec:a2:3d:2b:6f:42” -> null
- id = “28131876” -> null
- name = “Terraform Example” -> null
- public_key = “ssh-rsa XXX” -> null
}
Plan: 0 to add, 0 to change, 2 to destroy.
Do you really want to destroy all resources?
Terraform will destroy all your managed infrastructure, as shown above.
There is no undo. Only ‘yes’ will be accepted to confirm.
Enter a value: yes
digitalocean_droplet.web: Destroying… [id=203325069]
digitalocean_droplet.web: Still destroying… [id=203325069, 10s elapsed]
digitalocean_droplet.web: Still destroying… [id=203325069, 20s elapsed]
digitalocean_droplet.web: Destruction complete after 23s
digitalocean_ssh_key.web-ssh: Destroying… [id=28131876]
digitalocean_ssh_key.web-ssh: Destruction complete after 1s
Destroy complete! Resources: 2 destroyed.
Notas Finales
Ahora ya con estos dos directorio creados podríamos subirlo a cualquier repositorio de código. para hacer uso de esta infraestructura definida en código.
Recuerda que este fichero no debes subirlo a ningún repositorio de código git porque incluirá normalmente contraseñas y datos confidenciales, para ello crearemos un fichero .gitignore para que no se suban los ficheros que no nos interese
.idea

.terraform

terraform.tfstate*

terraform.tfvars
Comments